
This document is a guide to assist you with the functionality of AirIQ Fleet.
AirIQ Fleet is entirely mobile-friendly, so everything you do on your computer can now be done from yoursmartphone or tablet. To access it, simply go to airiqfleet.com and log in just as you would on your computer.We also recommend adding AirIQ Fleet to your favorites, so it’s even easier to get to
Everything for logging in and accessing Airiq's Fleet Management Software
View More

From your computer or mobile device, visit: airiqfleet.com
(AirIQ Fleet is entirely compatible with mobile devices!)
Log in to your new account using the credentials provided to you
(This includes your email, and a password that you created from your welcome email)
Upon successful login, the new AirIQ Fleet will appear with a map of North America:

On your first login, you’ll notice a features and tips banner – hover over it to close it

New Twitter notifications are displayed by a flashing Twitter logo in the top right corner that pulsates if there are new tweets available. Tweets usually include system updates and notifications regarding any changes made to AirIQ Fleet, such as new features or UI updates
How to change your password
View More

Select your username/email in the top right of AirIQ Fleet and select “Change Password.” You will receive an email with instructions on changing your password.
There are certain criteria required when creating a password. Your password must have:
How to access your historical data on Airiq Fleet
View More

To view an asset’s history, select the History Query icon in the asset’s Actions column.
This is found on the leftmost side of your details grid.

In the window that pops up, input your desired timeline to retrieve history data for, and select “Submit.”
You can use the calendar icon to specify a month, day and year
You can use the clock icon to ( ) specify a time in 15 minute intervals
Note that the end date must be later than the start date or you will be unable to perform the history query.

If the selected criteria returns a substantial number of plots the details box will filter out tracking events, however ALL plots will be displayed on the map. If you have a substantial number of plots for the timeframe you selected, we recommend that you either select a smaller time frame or run your data via a History Report.

If the selected criteria returns a substantial number of plots the details box will filter out tracking events, however ALL plots will be displayed on the map. If you have a substantial number of plots for the timeframe you selected, we recommend that you either select a smaller time frame or run your data via a History Report.
Upon a successful query, you will see travel lines and pinpoints on the map indicating where the asset has travelled in the timeframe you defined in step 2.

TIP: You can zoom in and out of the map by scrolling up or down, or selecting the + / -buttons on the bottom right. You can also use the drag zoom icon in the top left of the map.
How to receive e-mail and text notifications from AirIQ Fleet Software
View More

The Notification Setup page will appear, with all of your existing notification triggers, addresses and delivery windows. If you have none, this page will be blank.

Note: You need to have users in your address book to utilize notifications. The address book is located just below the Notification Triggers box shown above.
Add subscriber(s) to the address book to receive alerts.
In the Address Book, select:

and fill in the required information in the popup:

Select the trigger type that you require from the top right-hand side of the Notification Triggers box (shown above).
For this example, we will use

Give your trigger a name, description (optional), and the events that alertswill trigger on.
For example, a “Reckless driving” alert might use the following alerts to trigger on:

To set up a text notification (via SMS), get your carrier’s e-mail to SMS address format and add your phone number, then put the full address in the email field as shown above.
The most common Email to SMS address formats are below:

Putting 9058316555@txt.att.net in the Email field in the address book would send an alert upon the trigger to
(905) 831-6555 as long as they are an AT&T customer.
If you do not receive SMS alerts, confirm you have formatted the email correctly, and if so, contact your carrier.
Setting up a new user for your AirIQ Fleet Software
View More

For location of setup menu, see step 1 under “Adding geofences.”
You will see all of the current users in your company (as shown below):

Select

in the top right corner of the “User Accounts” box.
The User Email and Permissions box will appear with all of the available options (shown below):

Enter the user’s email (which they will use to log in) and begin to set permissions for your user. You can select various general permissions under the “User Email and Permissions” box as shown above.
You can also choose the specific reports and actions your user(s) can access by scrolling down to the“ Report Selection” and “Action Selection” boxes respectively:


Upon completion of the form, select “Save” in the top right corner (above the “User Email and Permissions” box).
Note: The user whose email you enter in “Email” will receive an account activation email that will prompt them to set a password for access to AirIQ Fleet.
TIP: You as an administrator do not have access to set or view user passwords. If a user has forgotten their password, they can select “Forgot your password?” on the login screen to reset it.
Setting up a new user for your AirIQ Fleet Software
View More

The box shown below will pop up. This is where you can set all of your preferences when you use AirIQ Fleet.
Units of Measurement: Your preferred units of measurement when working with an asset. This is also reflected in reports.
Map Defaults: You can choose to show all of your assets when you log in to AirIQ Fleet by default. You can also choose to show the asset icons (ex. pickup truck icon if your asset is set as a pickup truck). “Show assets in clusters” will group up your assets when zoomed out to a certain level. Zooming in past that will separate the groups (also known as clusters) into smaller groups/clusters, eventually splitting up to reveal all assets inside, along with each of their separate locations. Route lines can also be shown and are shown straight by default. This draws a line between points your asset has travelled to so you can visualize it easier. Stick to road allows these lines to lock on to roads, to create a more accurate visual. This feature is in preview mode so there may be inconsistencies. You can also choose to show your geofences right on the map – if unselected, you can view your geofences in the Geofence Editor

Other: You can choose your time zone which will be reflected in AirIQ Fleet and reports. You can also set an auto refresh interval, where AirIQ Fleet will auto refresh every amount of time you set in this field to give you an up to-date view on all of your assets.
Open modules in the same tab or different tabs
View More

"New Tab Icon" allows users to choose whether to open modules in the same tab or different tabs, offering greater flexibility in managing their workspace.

Click on the

to open the chosen module in a different window.
You can manage all basic functionality for your IQ-CAM on AirIQ Fleet, including calibration, event and sensitivity settings, recordings and more
View More

Important: After physically installing your IQ-CAM, you are required to calibrate your IQ-CAM beforeusing it, otherwise you won’t be able to see live video or most event types.
Calibrating your IQ-CAM:
Your IQ-CAM requires calibration if the camera icon is red, as shown:

If the IQ-CAM is not calibrated, you will be unable to view live video and the camera will not report events recorded using its internal accelerometer, including: Harsh Braking, Rapid Acceleration, Sharp Turns. The IQ-CAM must be online for it to be calibrated. Please confirm the vehicle is parked/stationary on flat, level ground before performing calibration, otherwise the IQ-CAM may get a bad calibration and report events incorrectly.
To calibrate the IQ-CAM:
After a successful calibration, the camera icon in the “Actions” column will turn grey, indicating the camera is now calibrated and live video is available. you will now be directed to the camera settings screen.
NOTE: If you attempt to calibrate the IQ-CAM while it is offline, you’ll be prompted to wake the camera up by tapping on the screen. After doing so, click “Retry,” and AirIQ Fleet will then proceed through the calibration steps as normal.
Here, you can manage the settings on your IQ-CAM.
View More

Camera Settings
Here, you can manage the settings on your IQ-CAM.
Driver Camera setting: Enables or disables the driver-facing camera. If disabled, it will not be selectable when watching live video or in recordings.
Microphone setting: Enables or disables the IQ-CAM’s microphone for audio in recordings. NOTE: Audio is not present in live video, only in recordings.
Vibration Detection setting: Enables or disables reporting of Vibration events on AirIQ Fleet. Vibration events occur when the camera is in standby mode and movement is detected. In certain scenarios, you may witness hyper reporting of this event so you can disable it here.

Driver Behavior setting: Enables or disables reporting of driver behavior events that use the accelerometer, including Harsh Braking, Rapid Acceleration, Sharp Turns. In certain scenarios, you may witness hyper reporting of this event so you can disable it here.
Distracted Driving setting: Enables or disables reporting of distracted driving events. Distracted Driving events use an infrared sensor next to the driver-facing lens that tracks eye movement of the driver and uses AI to determine the driver is distracted (i.e. looks away from the road, looks down, etc.) In certain scenarios, you may witness hyper reporting of this event (sometimes caused if the driver is wearing sunglasses) so you can disable it here.
Calibration setting: If a calibration is performed in non-desirable conditions (i.e. uneven ground, non-level ground, etc.), you may notice hyper-reporting of driver behavior events, vibration, or other odd behavior. If this is the case, re-calibrate your IQ-CAM here by clicking “Start Recalibration. ”Ensure that you are on flat, level ground when calibrating an IQ-CAM.
View live video from your IQ-CAM
View More

Viewing live video
To view live video from your IQ-CAM, ensure it is online and connected, then select the camera icon in the “Actions” column on AirIQ Fleet.

You will then be presented with a small “Live Video” window. To view the driver-facing camera (if enabled), select the
“ + “ symbol in the top right corner, and select “Driver Camera.” You should now see the driver-facing camera.

If your IQ-CAM is not calibrated, you will see a red camera icon and be unable to view live video –instead, you will be prompted to calibrate your IQ-CAM.
To turn off live video, click the X button in the top right corner of the “live video” window. We recommend that you do not leave live video on for a long period of time to ensure the IQ-CAM’s data limits are not exceeded.
Learn how to view your historic video/recordings
View More

Viewing historic video:
To view historic video/recordings, simply select your camera asset and perform a history query. You’llnotice a new film icon appear under the “Actions” column.
Depending on the status of the camera, some of these videos may be unavailable – there are two types of historic video: uploaded historic video (dark grey film icon), and local historic video (light grey film icon).
Uploaded historic video:
Uploaded historic video is reserved for events that are not typical tracking events. These events are usually caused by the driver, so they are uploaded to the cloud, so they can be viewed on AirIQ Fleet at all times. The following events will record and upload historic video:
Local historic video:
Local historic video is reserved for generic tracking events, as seen on other device types. These events are stored on the camera itself (hence the name ‘local’ historic video), so to view them on AirIQ Fleet, the camera must be powered and connected, as AirIQ Fleet needs to directly communicate with the camera to retrieve video from the IQ-CAM. The following events will record local historic video:
You can also retrieve video from the SD card directly with an SD card reader.
NOTE: Because local historic videos are stored on the SD card, these videos will be overwritten overtime depending on camera usage (the more the camera is in use, the more it is recording). As new videos are recorded, the oldest ones are deleted.
view historic video/recordings, simply select your camera asset and perform a history query.
View More
Downloading video clips from AirIQ Fleet:
To view historic video/recordings, simply select your camera asset and perform a history query. You’llnotice a new film icon appear under the “Actions” column.
You can download any video clip you see on AirIQ Fleet. Depending on the event type, the cameramay need to be powered or in standby mode for you to be able to download (tracking, leave/arrive):

Learn how to access various actions
View More

Various actions can be performed on your assets, depending on your company profile and user access rights.
You’ll find them under the “Actions” dropdown menu, as shown here:

To perform a search or narrow your criteria, select “Search.”
You’ll then see a small popup box where you can search by category and enter any filters that correspond to the category you selected. You can search by VIN, Make, Model, License Plate and more.
To remove any search criteria from your Filter(s), select the “x” next to the name.
Once you select search, the assets you searched for are now visible on the map and your grid, with the most recently retrieved information shown.

To perform an action on an asset, select the asset’s icon on the map or select the asset’s row in your grid, and select “Actions.”
To select multiple assets, use the grid’s checkboxes before selecting the action you wish to perform.
After selecting an action, an action submission window will pop up with your asset and other options (if you picked more than one asset, you will see multiple under “Selected Assets”).
After the action is submitted, a loading bar will appear. Once the device has completed the action you sent it, the loading bar will show “Successful” and the asset’s updated position and details will be displayed on the map and in the grid.

The Radius Search tool allows users to search historical data within a pre-selected radius anywhere on the map.
View More

Select “Search” from the menu bar and search/select the assets of your choice.
You can also select “Get All” to select all of your available assets.
In the top left of the map on AirIQ Fleet, select the small grey circle icon and draw a circle.
Your cursor will turn into a + and you’ll be able to draw a circle on the map by clicking anywhere, holding and dragging.

To resize the radius you’ve drawn, click it once and you’ll see 4 smaller circles show up around the edge – you can use those to drag and resize the circle. To delete the radius so you can draw another, double click on it.
Note: This search method will only search your preselected assets.
Proceed as you would with searching historical data, ensuring you click the “Search within drawn circle” box noted below, then select “Submit.”
(Refer to the “Accessing Historical Data” section for more information regarding performing a history query.)

Search and select the asset you wish to work with: Use the same steps as outlined under “Accessing AirIQ Fleet” (step 3)
View More
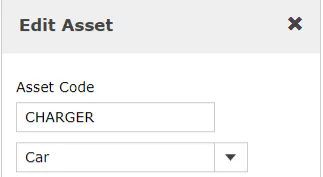
The “Edit Asset” window will pop up allowing you to edit any information regarding this asset you wish.
You can now change the desired fleet the asset is indirectly in the Asset editor.
The “Asset Type” you select (the first dropdown), for example a car or truck, will reflect the icon that is displayed on the map.
Once you are finished modifying your asset details, click the "Save" button to confirm and save your changes.

Learn How to use the view drop down menu
View More

The View dropdown menu is used to view and manage:

You can add maintenance schedules and service records to your assets, depending on your company profile and your user access rights.
View More

On AirIQ Fleet, select “Modules,” then “Maintenance.”
The Maintenance Module is located under the Modules drop down menu on the AirIQ Fleet toolbar, as indicated in the image below:
Upon selection of “Maintenance,” you’ll see a screen with all of your company’s assets, each with “Schedules” and “Service” buttons respectively:

You can use the “Filter Assets” and “Filter Fleets” fields above the table to search for an asset or fleet you’re looking for.
Select the respective "Schedules" button for the asset you wish to modify.

You will then see the following screen, showing any scheduled maintenance you already have, or in this case, nothing, as we have not added any schedules yet. You will also see the last reported engine hours and odometer.

Select “+ New Schedule” in the top right corner.
You will then see the following screen:

Enter a Schedule Name and fill in the details for whichever type of schedule you need. Example below
For example, if your schedule is odometer based, enter only the “Odometer Schedule” fields.

EXAMPLE: The values for “Odometer Schedule” shown in the image above will produce the followingresults for an oil change schedule:
Once completed, select “Save.”
This will add a new maintenance schedule to your asset, which you will now see by following step 2.
You can add maintenance schedules and service records to your assets, depending on your company profile and your user access rights.
View More
On AirIQ Fleet, select “Modules,” then “Maintenance.”
The Maintenance Module is located under the Modules drop down menu on the AirIQ Fleet toolbar, as indicated in the image below:
Upon selection of “Maintenance,” you’ll see a screen with all of your company’s assets, each with “Schedules” and “Service” buttons respectively:
You can use the “Filter Assets” and “Filter Fleets” fields above the table to search for an asset or fleet you’re looking for.
Select the respective "Service" button for the asset you wish to modify.

You will then see the following screen, showing any scheduled maintenance you already have, or in this case, nothing, as we have not added any schedules yet. You will also see the last reported engine hours and odometer.
Select “+ New Service Record” in the top right corner and fill in the service details as prompted.
You will then see the following screen:

If you want to keep the service record open for completion later, select “Save.” Otherwise, to close the service record now, select “Close this service record after it has been saved,” then select Save.
This will add a new service record to your asset
To close an open service record, open the service record by clicking

The following screen will show up, showing the details of the service record you are closing along with its maintenance schedules if there are any:

Select:

Note: If you have maintenance schedules attached to this service record and you want them to update automatically, check the “Update Schedule” box before closing the service record.
Otherwise, you will need to manually update the maintenance schedule. You will also not receive maintenance reminder notifications by email.

Learn How to add geofences to the AirIQ Fleet software
View More

On AirIQ Fleet, select “Setup,” then “Geofences.”
The Geofence editor will open up in a new tab.
In the search box in the top left, enter an address or place of interest.

Your entered location will then be displayed on the map.
To create your geofence, select one of the icons at the top of the map, as highlighted below:


Draw a circular geofence (click and drag)

Draw a custom shaped geofence (click each corner of a shape)

Draw a square shaped geofence (click and drag)
Once you have drawn your geofence, you will get a pop up to enter your geofence details. Give your new geofence a name and confirm the address details:

Once completed, select “Save.”
To edit, delete, or set notifications for a geofence, right click in the geofence.
You will see a small box pop up with your geofence details, along with the following buttons:

The Grid and Card options menu allows you to change various viewing preferences for your asset list.
View More

The Grid and Card options menu allows you to change various viewing preferences for your asset list. The menu can be found by clicking the settings cog on the left-hand side of the grid, as shown below:
The Geofence editor will open up in a new tab.

Grid or Card View (desktop)
This option allows you to change the asset viewing window to display as a grid (like a spreadsheet) or asset-by-asset (cards).Grid view is intended for desktop use, and Card view is intended for mobile/tablet use. The default is “Auto (best fit),” but this can be overwritten if you have preference or are experiencing issues with the current view.
Grid or Card position (desktop)
Here, you can choose where to show the grid/card view you have selected. You can choose to have it along the side of the screen, or bottom of the screen.
Grid Columns Shown (desktop)
This dropdown allows you to select and/or deselect any columns you wish to not appear in the grid.
Grid Menu Style (desktop)
This option allows you to choose the type of menu style when viewing AirIQ Fleet on desktop, between the classic layout of buttons (menu strip), or a menu wheel. Depending on the size of your screen, one option may be better than the other.

Initial View (mobile)
Here, you can choose which view (map or asset list) you see by default after logging into AirIQ Fleet on mobile.
Card Heading and Additional Card Heading (optional)
Allows you to choose which header(s) your cards are identified by when using card view (i.e. cards can be identified by driver as the header, by VIN as the header, etc.). You can also choose an additional heading(optional) to appear alongside the actual heading.
Sort By
Here, you can simply sort the asset list by attribute, for example: ignition or driver. You can also choose to have the sort ascending or descending.
Note: After making any changes, you may need to refresh your browser window.
How to view and access reports generated on the AirIQ Platform
View More

On AirIQ Fleet, select “Reports” and the reports dropdown will show:
Hovering over the title of a report will give you a brief description highlighting the use of the report.
The amount or selection of reports you see is dependent on your account settings and available access.
For this example, we will select the “History Replay” report.

Set your report criteria (assets, start/end dates, fleet(s), etc). Once complete, select “View Report.”

Some reports have a “Report Format” field (shown above as “Standard”). Setting this to “Enhanced” and again selecting “View Report” will give you more detailed address information, additional asset information such as make, model, voltage, ignition and more.
As long as there are results that meet your criteria as defined above, you will now see the report. Thereport can be exported to CSV, PDF, MHTML Excel and Word formats for external use, using the buttonhighlighted below:
New to AirIQ Fleet, you can now set your own report schedules. Want to receive a report for a specific asset at a certain time (daily, monthly, etc.)? Now you can!
View More
Note: Report Subscriptions access is a special permission that needs to be assigned by your account’s administrator.

You should see the following screen:

Select:

You should then see the following screen:

From here, simply select the report using the “Report” dropdown, and fill in the report parameters as you normally would (fleet, assets, etc.).
You can also select the "Preview Report in Selected Format" button to view the report as you have specified, to ensure that you receive the results you expect.
Next, you can set a schedule for the report, along with who will receive it. Simply select if they will receive it:
Under E-Mail Settings, type in the recipient’s e-mail in the “To:” field, with an appropriate subject line. Then you can choose the report format (.csv, .pdf, .mhtml, .xlsx, .docx) If you are entering multiple email addresses, separate them using a semicolon (shown below):

You can also enter any comments that will appear in the body of the e-mail along with the attached report.
Once you’re done, click Subscribe, and you will be redirected to the report subscription page, where you should now see the subscription you have just set up. From here, you can promptly edit or delete the subscription.
Note: You are limited to 10 report subscriptions per user.
calibrate your odometer or engine hours with the correct value of the asset upon installation
View More

Note: We recommend you calibrate your odometer or engine hours with the correct value of the asset upon installation to obtain the most benefit from the AirIQ solution. This is not required if the asset has an ECM connected device, as the odometer details will automatically be captured as long as the asset make and model support this feature.
You’ll find them under the “Actions” dropdown menu, as shown here:
Search and select the asset you wish to work with. Use the same steps as outlined under “Accessing AirIQ Fleet” (step 3
In the data grid, select the icon for the action you wish to perform:


Regardless of which you choose, both windows will look very similar. You will see the name of your asset code that you’re currently calibrating, the last odometer/engine hours value that the device reported, and the date that it was reported. Below that, under “Last Calibration,” you’ll see the values for the last time the asset’s odometer or engine hours were calibrated. If they never were, you will see the accumulated odometer/engine hours received from the GPS.
Enter your new odometer/engine hours value in the “New odometer/engine hours reading” field and select “Save.”

Once complete, your device will now record odometer or engine hours using that as the starting value. All recorded mileage or engine hours will be added on top of your value.
TIP: To change your units of measurement (ex. Km to Miles), select your username in the top right of AirIQ Fleet, then “Options” and select your choice from the window.
The Radius Search tool allows users to search historical data within a pre-selected radius anywhere on the map.
View More
Select “Search” from the menu bar and search/select the assets of your choice.
You can also select “Get All” to select all of your available assets.
In the top left of the map on AirIQ Fleet, select the small grey circle icon and draw a circle.
Your cursor will turn into a + and you’ll be able to draw a circle on the map by clicking anywhere, holding and dragging.
To resize the radius you’ve drawn, click it once and you’ll see 4 smaller circles show up around the edge – you can use those to drag and resize the circle. To delete the radius so you can draw another, double click on it.
Note: This search method will only search your preselected assets.
Proceed as you would with searching historical data, ensuring you click the “Search within drawn circle” box noted below, then select “Submit.”
(Refer to the “Accessing Historical Data” section for more information regarding performing a history query.)